7. FACE RECOGNITION
7.1 Face Recognition
On the Face Recognition page, you can view the results of real-time face capture and comparison. This feature requires the prior addition of a facial image through the "Face Lib Manage" page.
In the main menu, click on "Face Recognition" to access the detailed page, as shown in Figure 7-1.
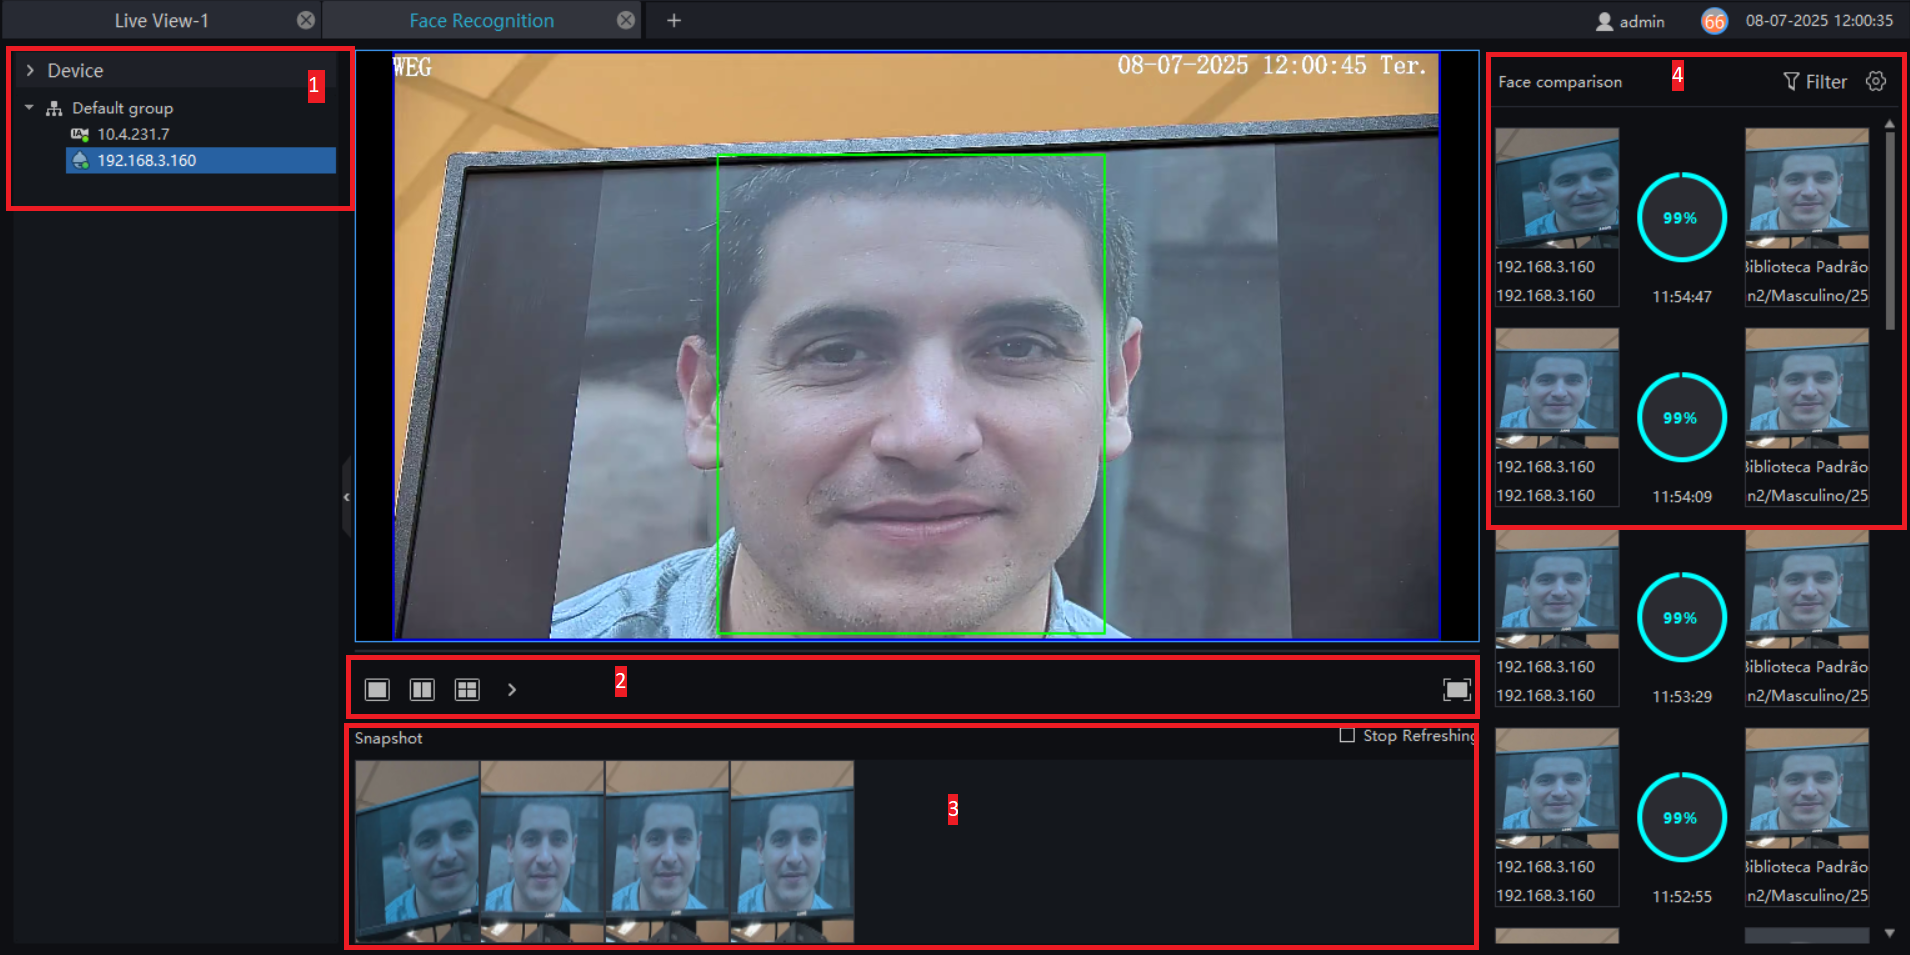
Functions Overview:
| Number | Function | Description |
|---|---|---|
| 1 | Device List | Displays the devices equipped with face recognition functionality. |
| 2 | Layout | Select the video layout. |
| 3 | Snapshot | Displays alarms triggered by recent captures. You can choose to stop the update. |
| 4 | Face Comparison | Compares captured faces with the library. Allows filtering of devices for quick matching by channel. By default, only real-time captures from 4 face recognition channels are displayed. These channels can be selected and configured, as described in Figure 7-2. When the valid time for a person expires, the captured image in the result will be marked as "invalid." |

Procedure:
Step 1: Devices with the facial capture function will automatically capture faces.
The capture appears in the facial comparison area.
Step 2: Click on the search icon located in the bottom right corner of the captured image to navigate directly to the intelligent search interface.
Step 3: Similar faces from the facial database that appear in the image will be compared in the comparison area.
If they have a similarity above the configured threshold, related information appears.
Step 4: Click on the “+” button displayed on the image to add it directly to the facial database.
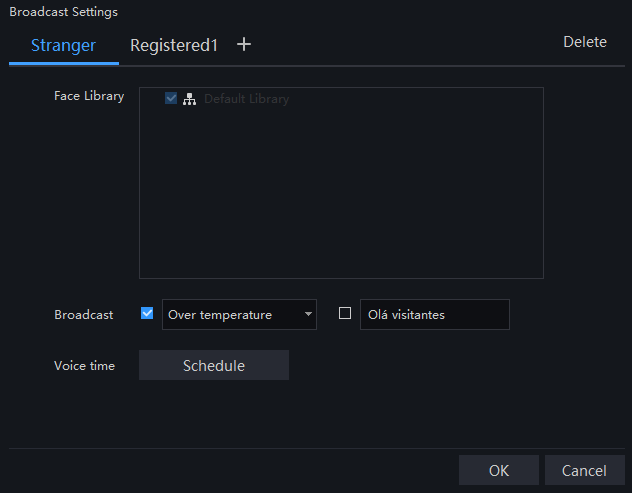
Procedure:
Step 1: Select the full-screen display mode.
There are two available modes: card view (requires card size configuration) and card list view.
Step 2: Enable the "Strangers" option.
If this option is not enabled, captures of strangers will not be displayed in the comparison area.
Step 3: For strangers, configure the voice broadcast content.
The text must contain a maximum of 10 characters.
Step 4: For employees already registered in the facial library, mark the corresponding option in the library.
You can configure the system to announce the name, the capture time, and play a custom text.
Step 5: Set the voice playback duration.
Step 6: Click on the “+” button displayed on the image to add it directly to the facial database.
7.2 Face Lib Manage
The "Face Lib Manage" interface allows you to create a multi-level face directory.
Different face libraries can be added, and personal information can be edited for facial recognition.
When the camera detects a face, it can compare it with the library to identify the individual captured.
In the main menu, click on "Face Lib Manage" to access the configuration page, as shown in Figure 7-4.
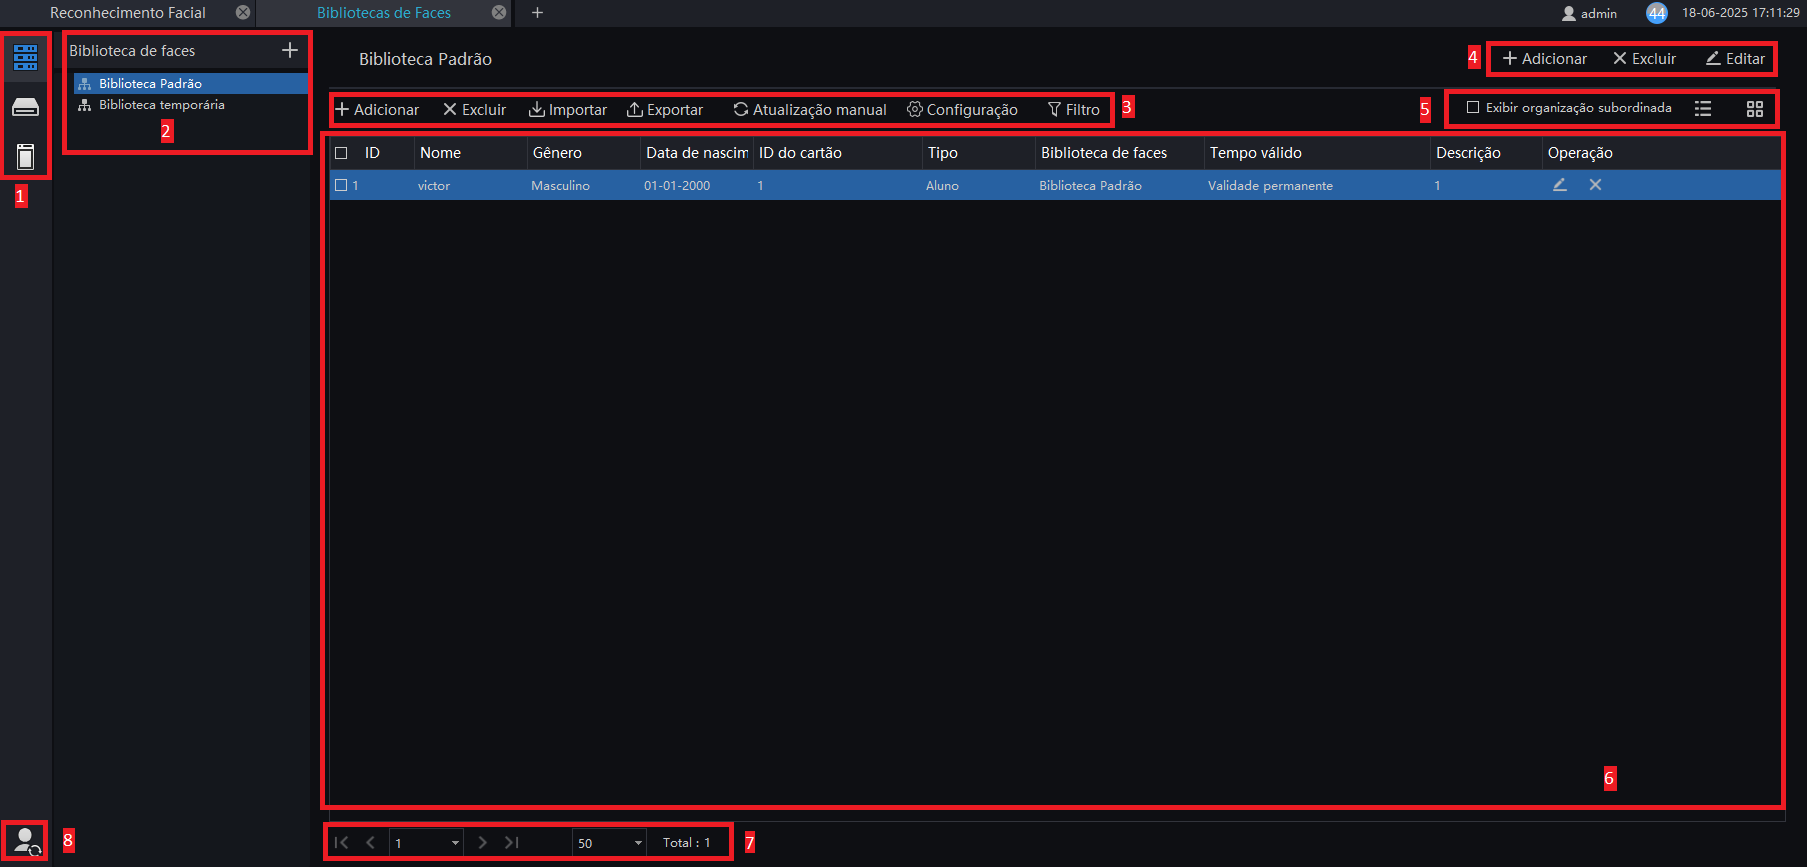
Functions Overview:
| Number | Function | Description |
|---|---|---|
| 1 | Face Library, NVR Face Database, and Access Control | Click the icon to switch the face database. |
| 2 | Face Library List | Face library, default group, and add library. |
| 3 | Basic Person Operations | Add, delete, import, export, manually update, configure, and filter. |
| 4 | Basic Library Operations | Add, delete, and edit library. |
| 5 | Layout | Toggle to display subordinate organization. Choose between list mode and card mode. |
| 6 | Registrations | Register faces. |
| 7 | Page Information | View page numbers, registration counts, and navigate to the next page. |
| 8 | Facial Database Sync strategy | The platform's libraries can be synchronized with the facial recognition terminal. |

Face Library Import Modes
There are two modes for importing face libraries:
- Device Import
- Local Import

Procedure for Device Import:
Step 1: Select the desired device.
Step 2: Choose the library to which the data should be imported and select the import mode.
Step 3: Define the strategy for ID conflicts and click “Import” to upload the libraries.
Step 4: The import result will be saved to the local folder.
Local Import:
Human faces stored in folders or local files can be imported to the platform in three different ways:
- Image Scale
- Image Import
- Form Import

Temporary Library
The temporary library will display all captured faces, and the number of captures will be shown on the screen.
-
Add to Library:
Click on "+" to add the stranger's photo to the library. -
Search:
Click on the magnifying glass to enter the face search interface.
Detailed Interface Navigation
In the temporary library interface, click on "Batch Input" to access the detailed interface, as shown in Figure 7-8.

Manual Updates
Click on "Manual refresh" to manually update photos, as presented in Figure 7-9.

Additional Actions
-
Add Task:
Click on "Add Task" to select the face library.
You can opt to check or uncheck the option "Ignore list update for the week."
The result appears in a window. -
Set:
Click on "Set" to define the configurations for the temporary library, as shown in Figure 7-10.

Filters in Temporary Library:
Click on "Filter" to define a filter, as shown in Figure 7-11.

The temporary library is updated live.
7.2.1 Adding a Face Library
Procedure:
Step 1:
Click on "+" to add a face library.
Step 2:
Enter a name, select a library, and provide a description, as shown in Figure 7-12.

Step 3:
Click "Save" to save the settings. Alternatively, click "Save and New" to save and add another new library.
7.2.1.1 Add Person Information
Procedure:
Step 1: Select the face library.
Step 2: Click on "Add" to add personal information.
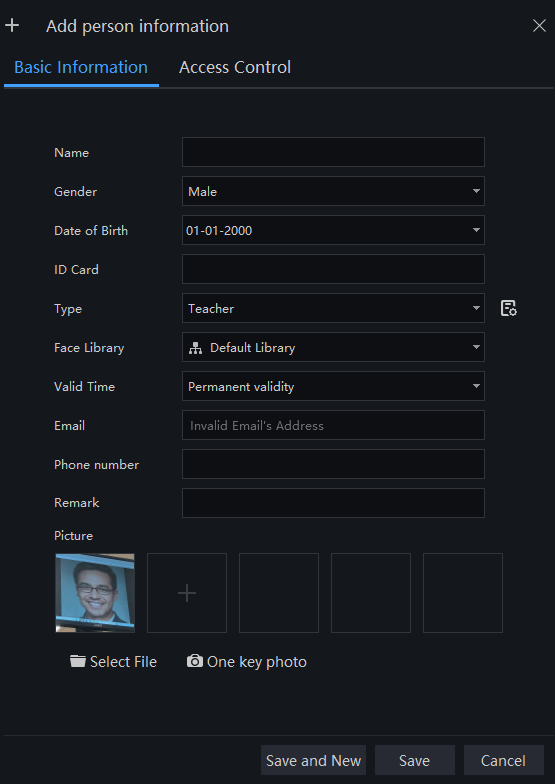
Step 3: Enter the required information, as shown in Figure 7-13.
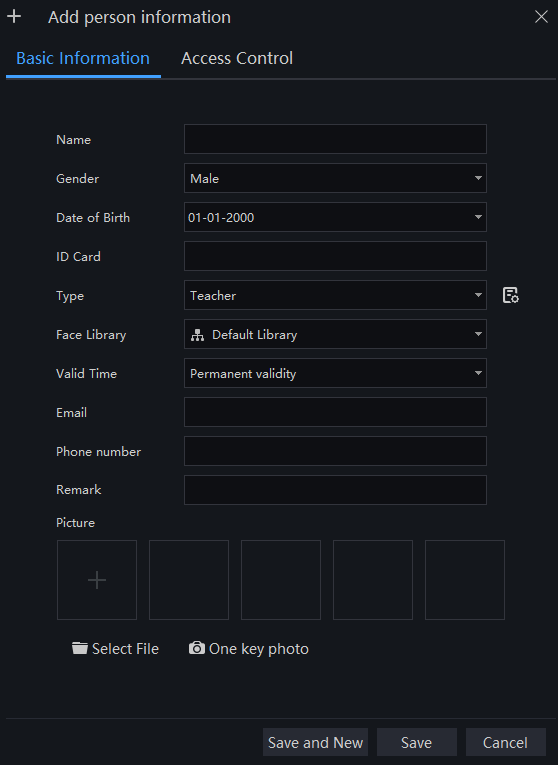
Click on  to add or delete types.
Step 4: Add one or more photos for the user; more photos increase the comparison rate.
Step 5: Click on "One Key photo" to immediately capture the image of a person, as shown in Figure 7-14.
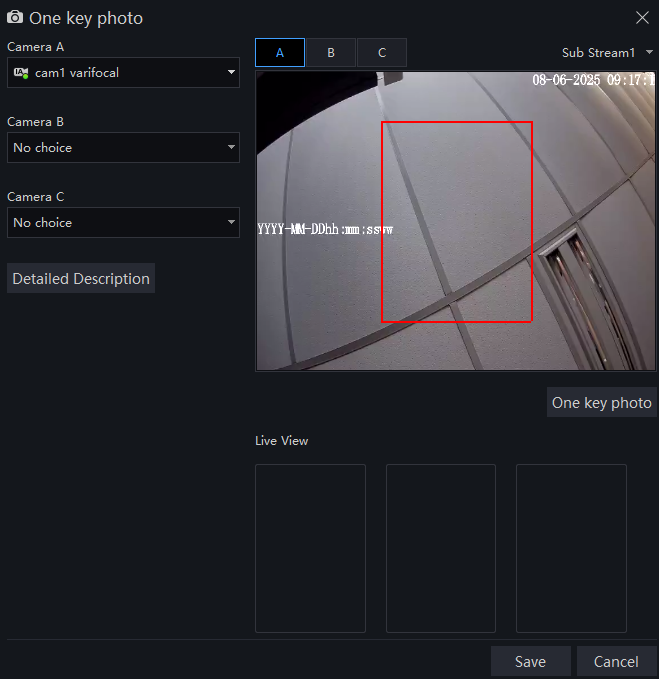
Step 6: Select a camera to perform the capture. If you want to capture multiple images and improve the comparison, you can choose up to 3 cameras to capture from different angles. The computer's webcam can also be used to capture the face.
Step 7: Click "Save", and a confirmation message appears the person was successfully added appears.
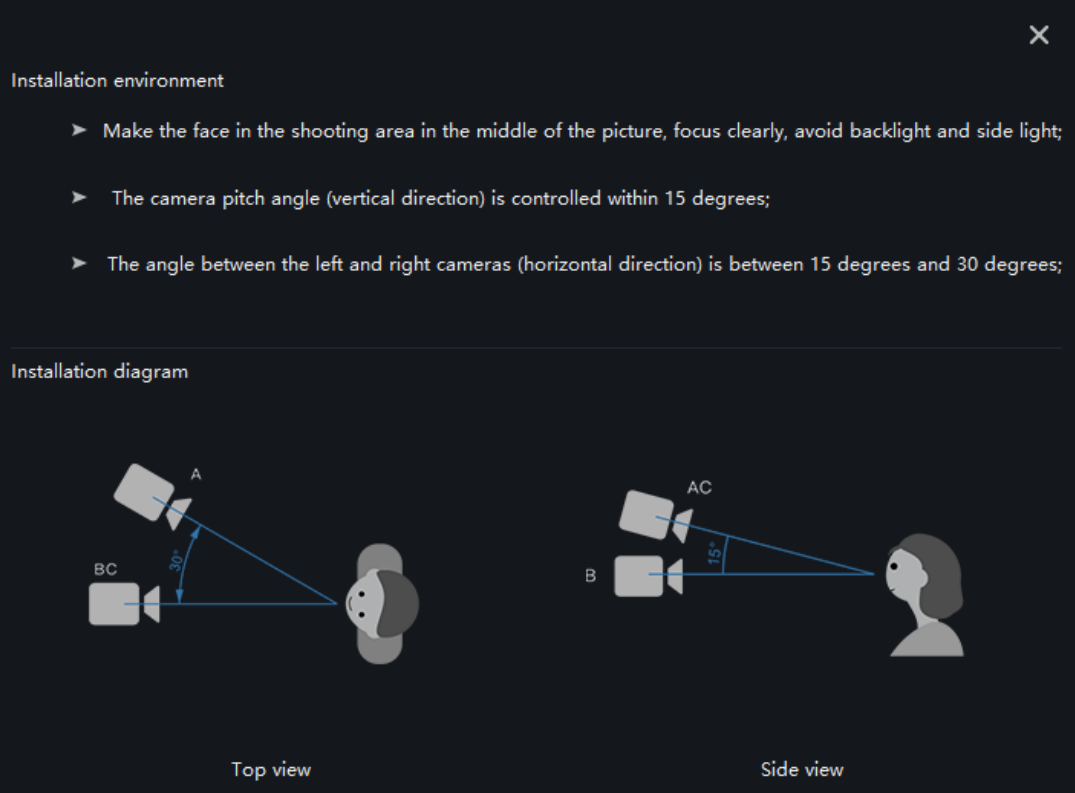
Clear facial images are highly recommended as they provide greater accuracy in comparisons.
7.2.1.2 Batch Export
Template Procedure:
Step 1: Click on "Export" and select the "Export Template" option.
Step 2: Edit the name of the exported template and save the changes.
Personal Information Procedure:
Step 1: Click on "Export" and select the "Export Personal Information" option.
Step 2: Edit the exported name and save the changes.
7.2.1.3 Face Settings
Procedure:
Step 1: Click on "Set" to enter the face settings interface, as shown in Figure 5-16.
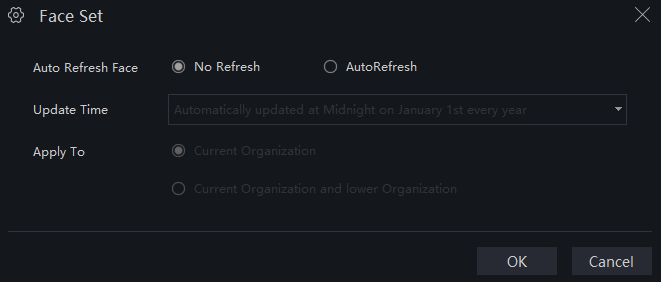
Step 2: Select "No Refresh" or "Auto Refresh".
Step 3: Choose the update time.
Step 4: Click "OK" to save the settings.
7.2.1.4 Filter
Procedure:
Step 1: Click on "Filter" to enter the filter interface, as shown in Figure 7-17.

Step 2: Enter the data as needed.
Step 3: Click "Confirm" to save the settings.
7.2.2 NVR Face Database
In the NVR face database, the platform can set the parameters of an online NVR, as shown in Figure 7-18.
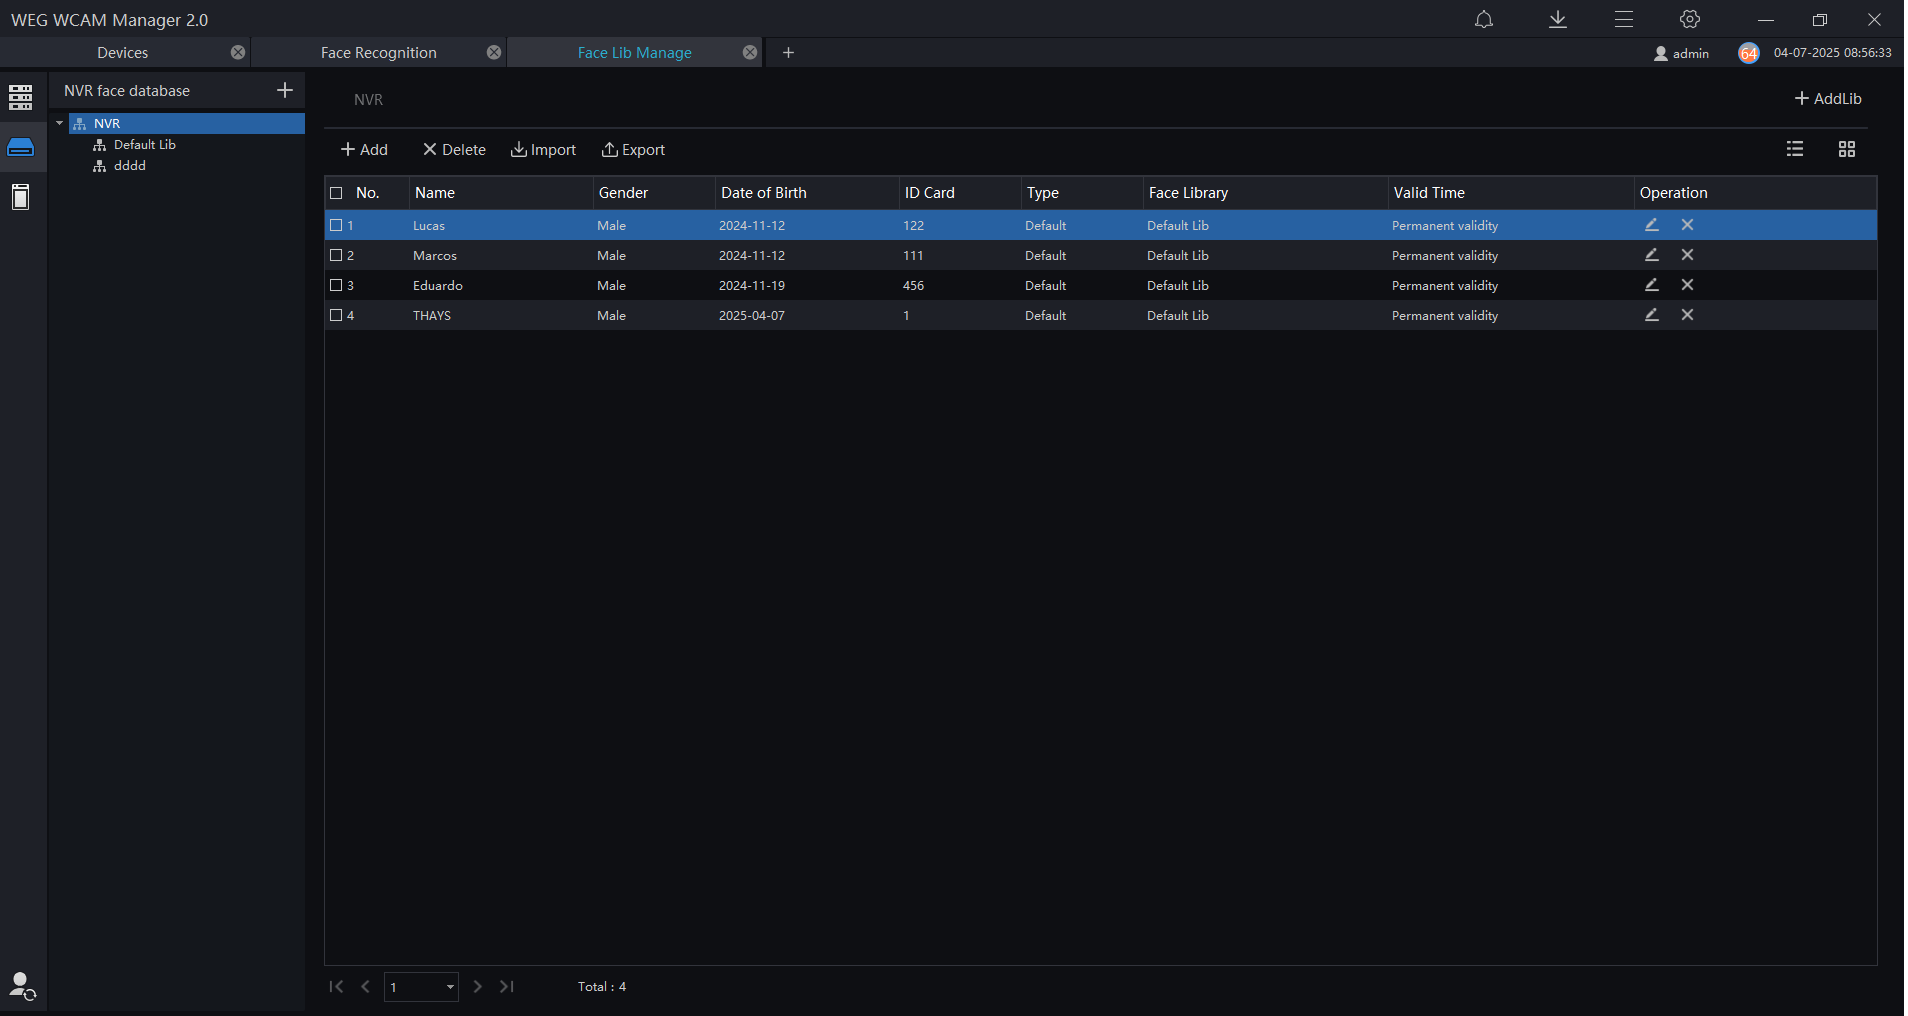
Add people or libraries to the NVR database, as shown in Figure 7-19. Users can delete/import/export the database in this interface.

7.2.3 Face Database Sync Strategy
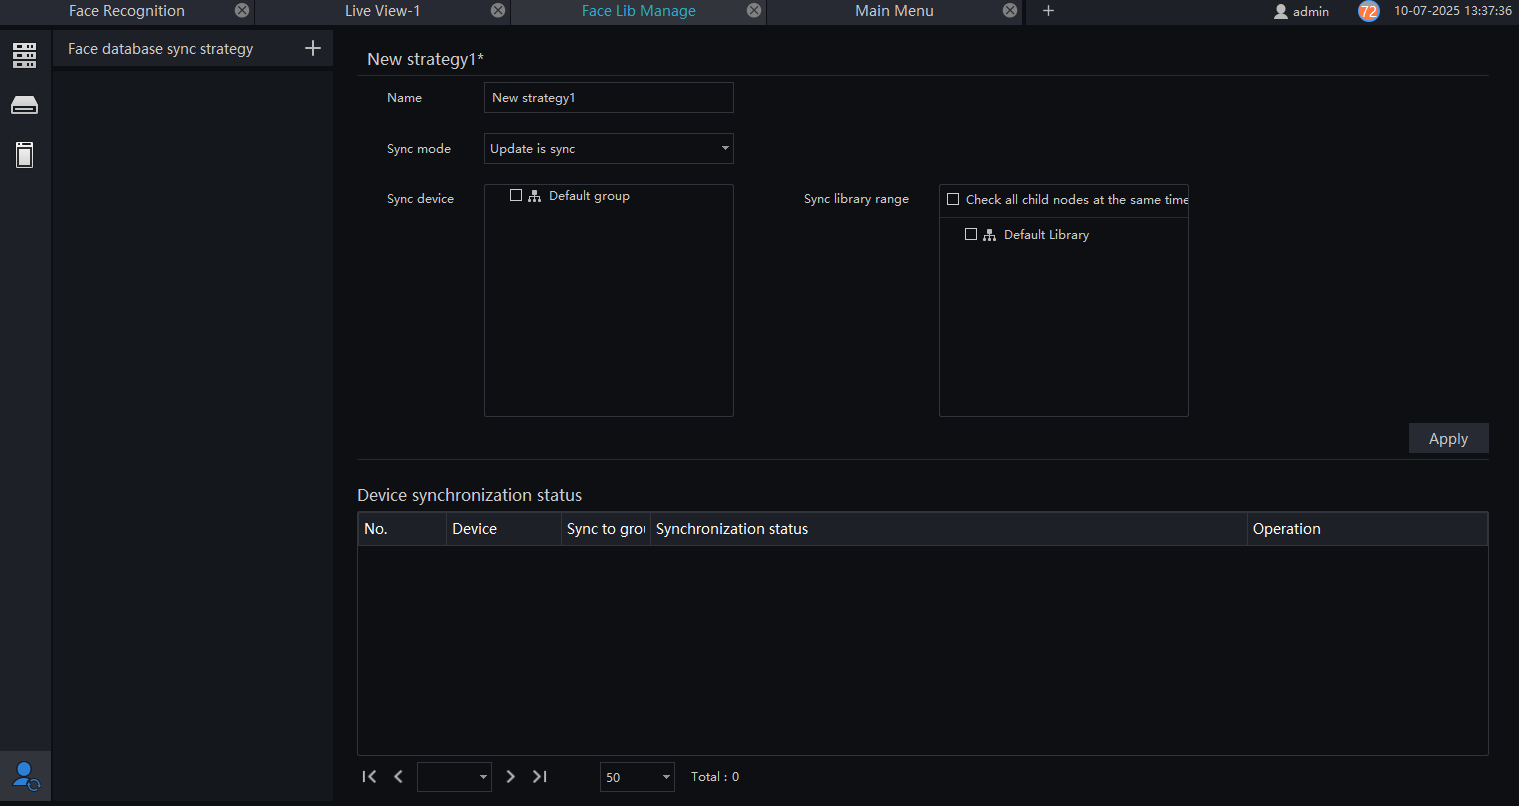
This function is specific to access control cameras (such as thermal cameras with facial recognition) and AI NVR. The platform and camera can share the face library for access control cameras, as shown in Figure 7-21.
Procedure:
Step 1: Click "+" to add a new policy, as shown in Figure 7-22.
Step 2: Edit the name and choose the sync mode.
Step 3: Select the sync device and the sync library interval.
Step 4: Click "Apply" to save the settings. The sync status of the device appears at the bottom of the interface.
Sync failure means the facial library could not be synchronized with access control. The user can check the logs to identify the reasons. Waiting for sync means the device might be offline.
7.3 Face Match Config
On the facial recognition configuration page, you can add a comparison strategy between the camera and the face library so that different cameras are compared with different face databases. When the camera detects a face, it only compares it with the selected library.
This function is only for cameras with face detection.
In the main menu, click on "Face Match Config" to access the configuration interface, as shown in Figure 7-23.
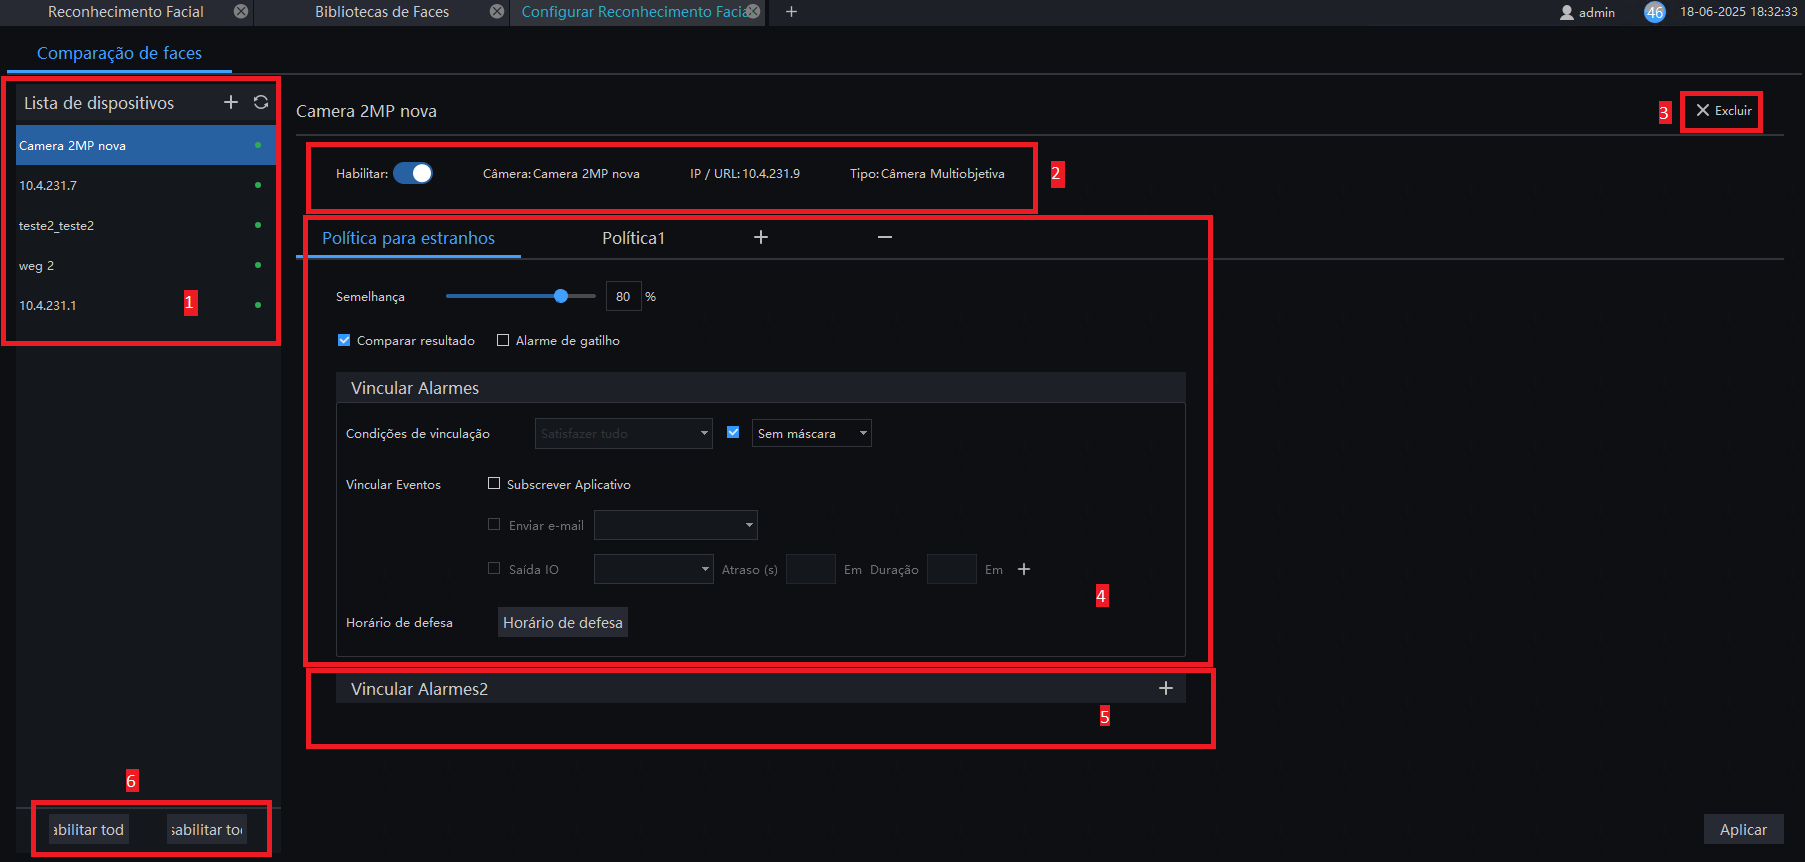
| Number | Function | Description |
|---|---|---|
| 1 | Device List | All devices with face detection are displayed in the list |
| 2 | Device Information | Detailed information about the device |
| 3 | Basic Operations | Delete device |
| 4 | Strategy | Add/Modify/Delete the policy for strangers or strategy |
| 5 | Event Linkage | Add/Modify/Delete alarm links |
| 6 | Enable/Disable All | Activate or deactivate the face detection function on all devices |
7.3.1 Facial Comparison Configuration
Procedure:
Step 1: Click the "+" icon next to "Strategy" to add a strategy.
Step 2: Configure the settings according to your needs.
Step 3: Click "Apply" to save the settings.
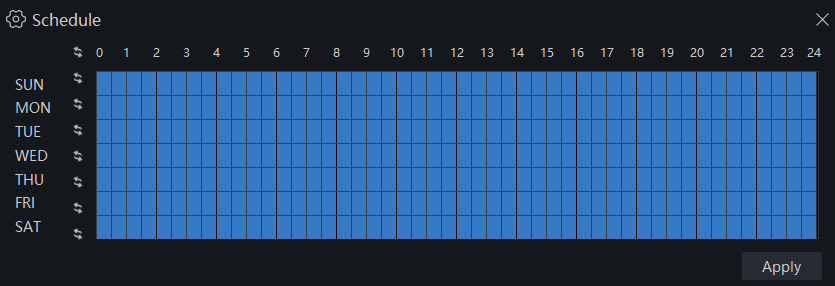
The user can set binding conditions, such as a person with elevated temperature or without a mask. These two conditions are only applicable to body temperature measurement cameras.
In the binding scheme, the following options can be selected:
- App Notification
- Send Email
- IO Output (select ID and set the duration).
7.4 Face Search
On the "Face Search" page, you can select a face image. The system will search the platform for photos that match the face based on facial similarity. After this, it is possible to view and replay the person's trajectory on a map.
This function works only for cameras with facial recognition.
In the main menu, click on "Face Search" to access the detailed interface.
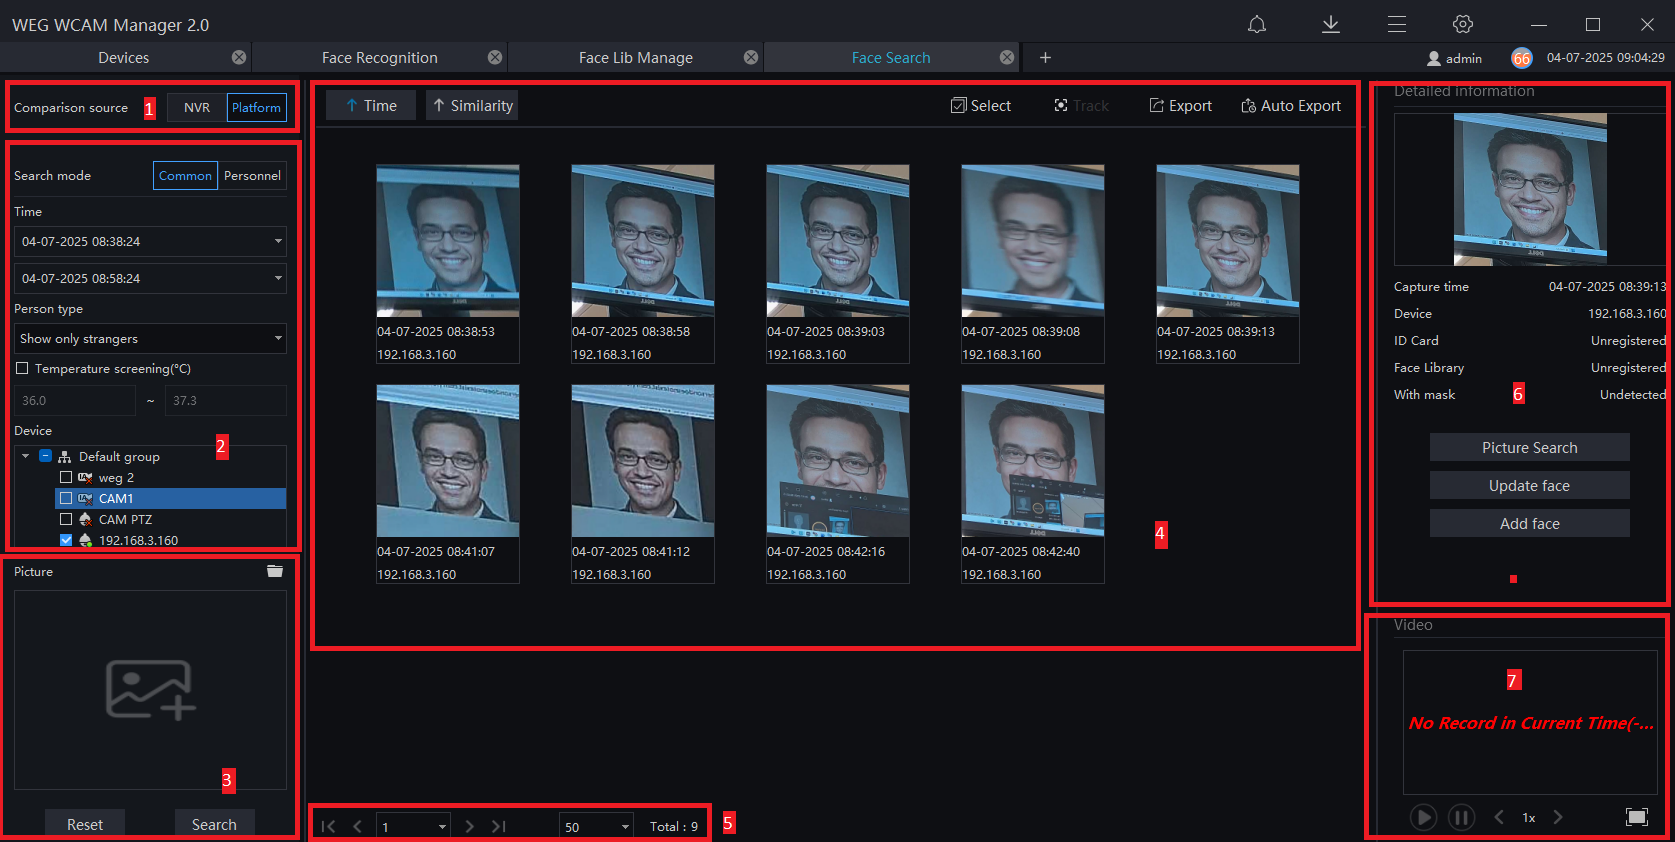
| Number | Function | Description |
|---|---|---|
| 1 | Comparison Source | Choose the comparison source to perform the search: platform or AI NVR. |
| 2 | Set Search Mode | The search modes are common and personal. - Set the search time. - Select the capture camera; mark the group to select all cameras. |
| 3 | Picture | - Select the image from the local folder. - Set the similarity. - Reset: Resets the search items. - Search: Click "Search" to perform the query. |
| 4 | Results | Displays the results of the search for similar faces. |
| 5 | Page Information | Number of pages, total pages, and navigation to the next page. |
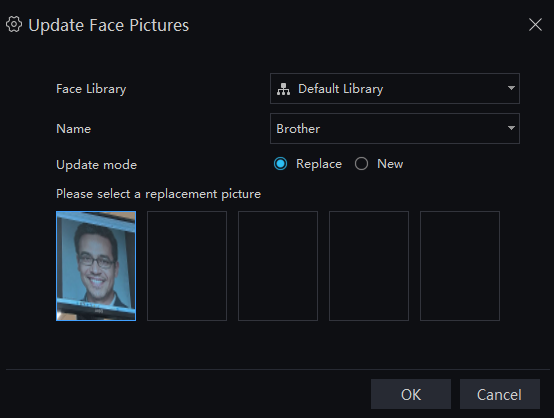
| 6 | Details | - Click on the image from the query results to display the panorama as captured. - The captured image can be inserted into the facial database. - To search directly using captures, click "Picture Search". - Click "Update Face" to update facial images in the database, as shown in Figure 7-26. - Click "Add Face" to register the searched image in the database, as shown in Figure 7-27. - Access the facial database and search for images. - Images captured by the camera are usually stored in the "snap" folder by default. - Click "Export" to export the search results. |
7.4.1 Picture Search
Procedure:
Step 1: Click on  to select the image.
Step 2: Set the similarity level.
Step 3: Click on "Search". The results appears based on time and similarity.
Step 4: Clicking on the images in the results will display the details.
Step 5: Click on "Register" to display the "Person Registration" pop-up interface. Enter the relevant information and then save.
Step 6: Click on "Select" for the photo from the search result.
7.4.2 Track
The user needs to configure two or more cameras with face detection on the Map first.
Procedure:
Step 1: Click on "Select" to choose the images.
Step 2: Mark the photos from different cameras.
Step 3: Click on "Track". A pop-up with a map will appear, as shown in Figure 7-29.
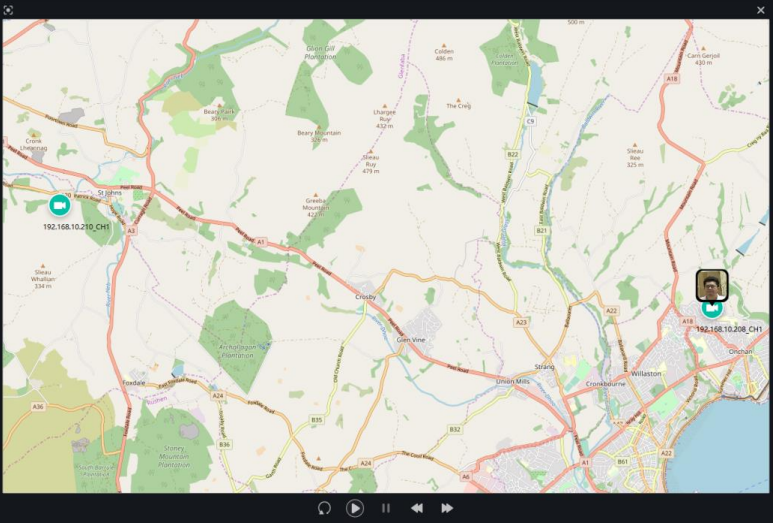
Step 4: Replay or execute the trajectory line again.
7.5 Classification Query
On the "Classification Query" page, you can set the search conditions for the images.
This function only works for cameras with face detection.
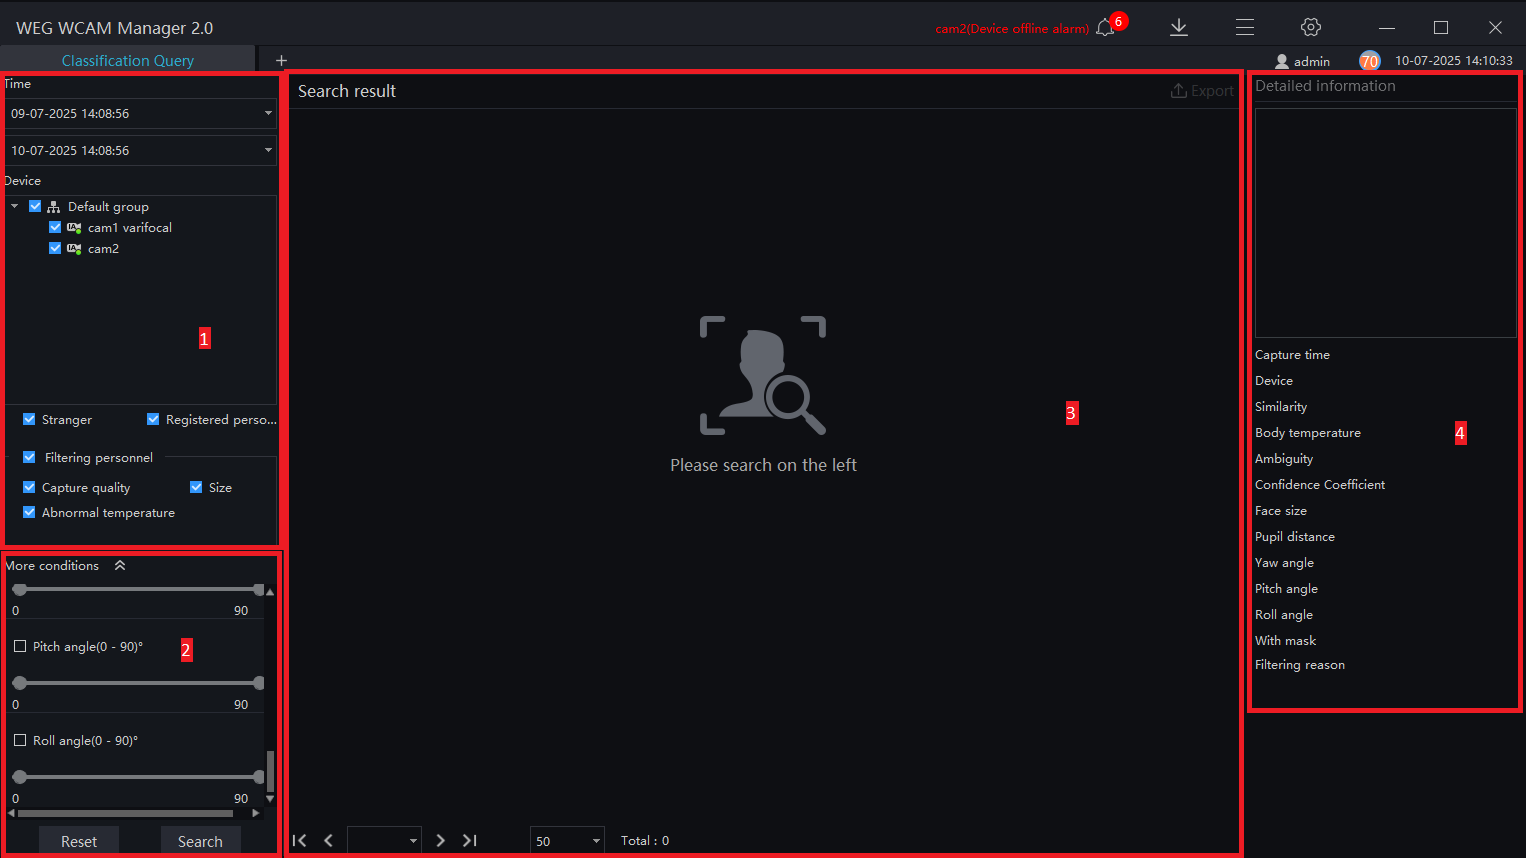
In the main menu, click on "Classification Query" to view the configuration interface, as shown in Figure 7-30.
| Number | Function | Description |
|---|---|---|
| 1 | Basic Query Conditions | Set the start time and end time. Mark the devices and modes of the facial libraries. Select personnel filtering conditions, such as capture quality, size, and abnormal temperatures. |
| 2 | More Conditions | Set similarity, confidence, face size, distance, yaw angle, pitch angle, and roll angle. |
| 3 | Results | The query results. |
| 4 | Detailed Information | The query results display detailed information. |
Procedure:
Step 1: Set the query start time and select the device.
Step 2: Define the query conditions.
Step 3: Click on "Search" and the query results appears.
Step 4: Click on "Reset" to reset the query criteria.